
You have probably heard that there are four types of foot types: flat, wide, narrow, and high arch. The shape and size of your foot are determined by genetics. The foot type you were born with will dictate the shape of your feet and your gait patterns as well. All of that being said, proper lacing techniques are crucial to creating a lacing system that fits you properly and will prevent foot discomfort.
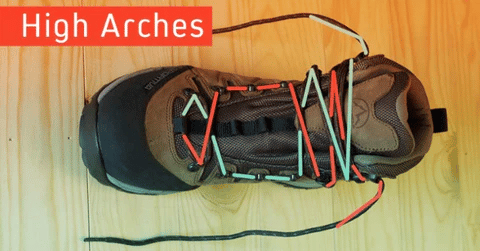
Lacing Technique for High Arch Feet: Criss-Cross Pattern
There are a lot of different ways to do this, but here’s something that every high arch foot should know: lace up your shoes with criss crossing patterns.
Why is this important?
Well, if you lace up your shoes in a criss-cross pattern, then the shoelace will only have to go through the shoe sides. This means that you won’t have an extra piece of fabric tied around both sides of the shoe. This will help keep your shoes on better and keep them from slipping off as easily.
You don’t need to use an exact criss-cross pattern—just make sure that when you tie your shoelaces, you tie them with two eyelets on each side (this is called a double knot).
That way your shoes are still tied tight enough so they don’t slip off when you’re running around outside or sliding around on the ice.
Lacing Technique for Tight Shoes: Parallel Pattern
The old standby for tight shoes is the parallel shoe lacing method. Simply lace up your shoes in this way: lace up one side of each shoe first; then lace up the other side of each shoe in a parallel fashion; then tie up the shoe as usual.

The best part about parallel lacing is that it doesn’t require any additional effort from you. All you need to do is start by threading your shoelaces underneath every other eyelet and tying them up as usual. Once you’ve finished tying up the shoe, all you have to do is put on your socks and go!
Lacing Technique for Slipping Heel: Straight Last Hole Pattern
If you have a high instep, you may find that your heel slips up when you try to lace your sneaker. You can solve this by tying off the shoe as usual, but this will result in less support for your ankle.
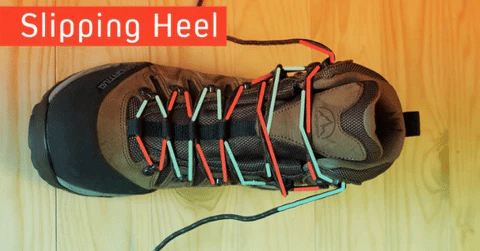
Instead, try lacing it down until the second-to-last hole and then go straight up with the lace so that it threads through the loop off of the other side. This gives more support and prevents your shoe from feeling tight.
Lacing Technique for Toe Nail Pain: The Toe Space Lacing Pattern
Toe pain is no joke, but it doesn’t have to be a serious problem. If you’re experiencing toe pain, try lacing techniques for toenail pain that will lift your toes and make them feel more comfortable.
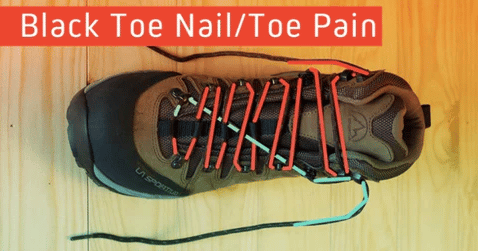
The first thing you need to do is lace from the big toe to the top on the other side. This will help to relieve the pressure on your toes, which is often caused by tight shoes or socks. Next, thread the other side of the shoelace at each bottom diagonally and at the top parallel to the next hole. This will help to create space between your toes so that they can move freely without being restricted by tight shoes or socks.
Lacing Technique for Wide Forefoot: Side-to-Side Lacing Pattern
When you’re tying your shoe with a wide forefoot, remember that the “crossover” technique is your friend.
You’ve probably heard of it—it’s the way you tie your shoes so that the shoelace crosses over itself on the inside and outside of your foot. It gives you more room in the toe box, which makes it easier to slip your foot into a tight-fitting shoe.
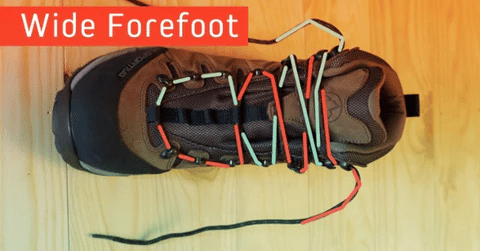
But did you know that this technique also works for wide forefoot? If you’re not sure how to do it, just follow these simple steps:
Thread both sides of the shoelace through the front hole of your shoe (ignore the back hole). Then, thread one side through both holes again. You’ll now have two shoelaces tied together in a cross over each other on top of both sides of your foot.
Next, weave them together at mid-foot and repeat this process until all four corners are tied off. When finished, it should look like a series of crisscrosses across your entire foot—and there’s plenty of room in there.
Some More Lacing Techniques for Different Foot Types
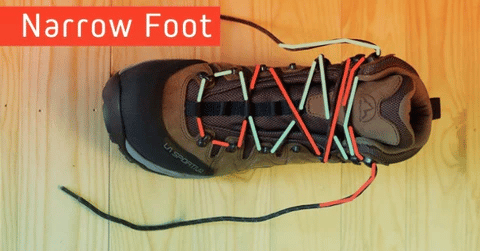
- Narrow Feet – Criss Cross Lacing Pattern
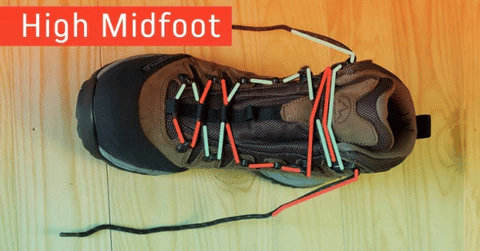
- High Midfoot – Criss Cross Lacing Pattern
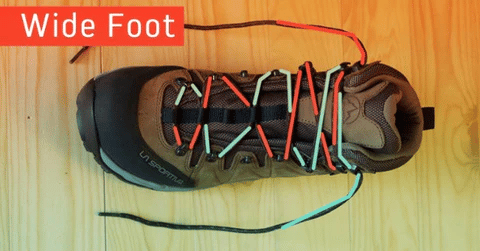
- Wide Foot – Criss Cross Lacing Pattern
Conclusion
A lacing technique can make a world of difference in how your shoe fits. If you’ve got a high instep, for example, then you may want to try a traditional criss-cross. If you want extra support for an elevated heel, try the T-bar method. On the other hand, if your foot is wide or just not shaped ideally (i.e., know orthotics), then try segmenting your ankle area to relieve some pressure during the off-season. Experimentation with different methods will give you the best chance of finding something that works for you and your feet—and after all, that’s what matters most when it comes to fitting shoes for your feet type.
